- Data Recovery
- Data Recovery for PC
- Data Recovery for Android
- Data Recovery for iPhone/iPad
- Unlock For Android
- Unlock for iPhone/iPad
- Android System Repair
- iPhone/iPad System Repair
Updated By Cameron On Dec 24, 2022, 5:34 pm
How to recover PPT files when they are not saved or deleted? We often use PowerPoint when preparing class presentations or work product presentations, but PPT files often are deleted by mistake or not saved. When the PPT is lost, we can find the original storage location of the PPT file, and then restore the historical version of it. This article will introduce you how to restore your PPT if it is not saved or deleted by mistake. Don't panic, follow our tutorial to get it back.
Whether our computer is a Windows system or a Mac system, it is easy to retrieve unsaved PPTs. We only need to restore the historical versions of the PPT files. There are two ways to restore the historical versions of PPTs. The first is to find the location of the auto recovery files to recover the PPT file; The second is to restore PPTs via the Manager.
Operation steps: Open the PowerPoint file and click "File" - "Options" - "Save". There is a bar of "Automatically restore file location" on the saving interface. The folder path in this bar is the location of the backup file. Copy the location and enter it into your computer, and the folder will open. Finally, just save the backup PowerPoint files in the folder by "Save As", and the recovery of the PPT historical version is successful.
Operation steps: Open the PowerPoint file and click "File" - "Information" - "Manage Presentations". After clicking the box of "Manage Presentations", the drop-down button "Restore unsaved presentations" will appear under it. Click this button and select the version you want to restore in the popup. In this way, using the Manager to restore the historical version of the PPT file is also successful.
Both Windows computers and Macs can use the above two methods. And they both work by using automatic backups of files to address the problem of how to restore a PPT without saving it. The operation procedures are also very similar, know where to find the PPT recovery file, backup file will be restored naturally.
The operation steps are also very similar. If you know where to find the backups of PPTs, they can be recovered easily.
The above section tells you how to restore PPT files when they are not saved. Here we explain how to restore PPT files when they are deleted by mistake. Deleting a PPT by mistake can be a drain on our energy, but quick recovery is an excellent remedy. The two methods mentioned above can be used. But PowerPoint's periodic backup function may not work, and there is no guarantee that the saved content is up to date. In order not to save energy and protect the work results, it is recommended to use Data Recovery (4DDiG) to retrieve the PPTs. The specific steps are as follows:
Step 1: Download and install Data Recovery (4DDiG) on your computer.
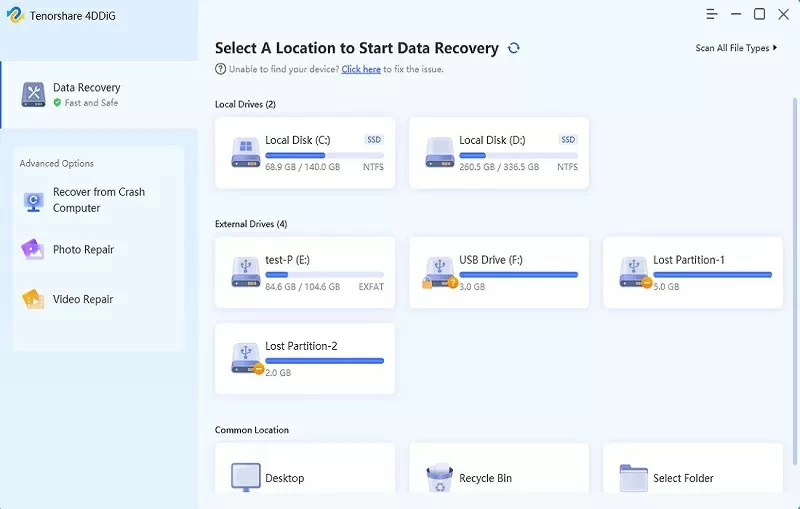
Step 2: Open the tool and select the hard disk where the PPT file is saved and click "Scan".

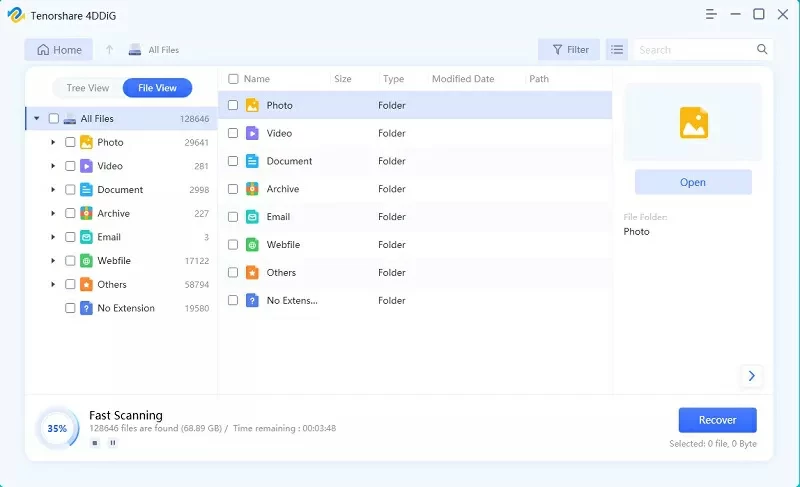
Step 3: After the scanning, find the files to be restored in the scanning results list. After selecting the files, click "Restore" in the lower right corner.
Tips: There are many ways to find a file, such as double clicking on a file to preview, or using a filter to find a file.

Step 4: Click "OK" in the pop-up window, and the PPT is restored.

Whether you are using a Windows or Mac computer, as long as you master the operation of restoring the historical versions of PPT, you can always retrieve the PPT without saving it. To retrieve unsaved files, you need to use the automatic saving function of the office software, but this function is not always effective. If the saving function fails or files are deleted by mistake, the Data Recovery (4DDiG) recovery software can be used. Data recovery (4DDiG) can retrieve PPT files in a few simple steps without damage. Come and have a try.